Showing posts with label nails. Show all posts

Saturday, 9 February 2013

Glitter Gradient Manicure

I wanted my nails to match my sparkly shoes and sparkly mood yesterday as I went out to celebrate my birthday with my favourite friends. When I happened upon Rimmel's Disco Ball polish I suddenly thought that glittery tips would be a fun direction :-)

My first nail tutorial in ages! Click here to see other tutes that I have written.


The idea is to make it look like you have dipped the ends of your nails in glitter, this works with longer square or oval nails, I hope you'll give it a go!


1. Start with a base coat of a bright colour. This look also looks fab with neutrals! You'll need to find a glitter with a sparkle that matches your base coat.


2. Here's a close up shot of my glitter. Disco Ball by Rimmel is a lasting finish shade and I chose it because the silver glitter has a blue sheen.


I was a little disappointed with the distribution of glitter in the base. This polish offers a very subtle look with just one coat and none of the slightly bigger pieces that bring glitters out of that retro, 1990's look that they can have sometimes. The blue I used is Barry M Cobalt Blue 291.


3. I would highly recommend that you wait for the base coat to dry thoroughly before moving on to the next step - you're going to use a whole bunch of thin layers next and you'll greatly reduce drying time if you wait at least 20 mins between base and glitter. Paint just your tips to start off. If you have a glitter with some bigger pieces, use your brush to pop them in this section. I painted about the same size area as a I would with a French Manicure.


Here is a close up of the first layer of glitter. One of the really awesome things about this manicure is that because you are layering lots of polish at the tips, you reduce the risk of a breakage during the wear. I know I have a split in one nail so I still have this design on right now.

 
4. Wait five minutes and then do another coat of glitter, this time going a little further down the nail. You can see from the two pictures above how much extra needs to be painted with each coat!


5. For a finely dispersed glitter like this one, you will need to do about 5 coats over all. Make sure the layers are thing or you'll get a gloopy final look. Bigger glitter will not need as many coats, I have Barry M Rose Quartz which I often do this manicure with over a neutral base and it takes 3 coats for the tips to look totally covered.
 
 
Use a top coat or you'll have a grainy, bumpy finish!
 
Hope you love this fun sparkly look, are you going to give it a go? 

Thursday, 18 October 2012

Unicorn Horn Nail Tutorial

Who doesn't want unicorn horn nails? I love these so much I've been wearing them for three days :-)


I hope you love this tutorial as much as I loved making it :-)


I used Barry M in creamy lilac to do a base coat - one of my favourite colours. I think this tutorial would work just as well with a pale blue or pink, or even navy or black. I've showed the second pic to show how shiny it is, it really looks nice on it's own, I'm already halfway through the bottle!


Matte topcoat is my new favourite thing ever. Look what it does to this shiny lilac! How awesome right? You'll need to use a matte topcoat twice in this tutorial, because you won't get the same effect if you use a regular topcoat over the whole thing and it won't last very long otherwise.


Use a thick, opaque white to draw on unicorn horn shapes. I guess you could use tape for this step, but I find it hard to get the horns centered that way. The simplest method is to get a little paint on the regular brush that it came with, start at the base and drag upwards, lifting the brush as you get the tip of the nail. Try to lift it right off at the end to make a point. You can see above where I have gone back with the lilac to tidy up my horn points.


Once the points are nice and pointy, paint over the whole nail with the matte topcoat again. This should ensure it lasts at least two or three days (unless you happen to be taking pictures of your nails and end up smudging one, booo!)


Cut a strip of cardboard just slightly thinner than the widest point of your horns. Splodge a bit of metallic (gold or silver would look cool!) polish on a plastic surface. Next, take your strip of cardboard and dunk it into the splodge. Make one 'stamp' of the the very end on a bit of tissue to get the excess off, and then use the very end of the cardboard to print tiny lines at an angle going up the horn. I found I only had to reload the card every few nails because I was pressing really lightly. As you get to the top of the horn, tilt the card so you are just using the very corner. Easy!


Done! Cute right? I'd love to know what you think and if you gave this one a bash - don't be afraid to send me a pic, I'll show any pics I get here on my blog with your link :-)

Monday, 24 September 2012

Mermaid Manicure Tutorial

I hope you enjoyed my post yesterday, 5 simple ways to increase your blog traffic. If you missed it, have a look here.

I'm back today with a fun tutorial for a manicure that reminds me of a mermaid. There are some very cute mermaid-specific manicures knocking about on Pintrest, but I've been wanting to try this all-over dotting technique for a while, so here I am giving it a bash. Please feel free to ask any questions!


You'll need:
Three colours of nail polish that remind you of the sea. I've used Barry M 291, Colbalt Blue, Barry M 304, Mint Green and M & S Baby Blue.
A metallic polish. I've used Barry M 319, Foil Effects Silver.
A Bobby Pin bent out of shape
Teeny gems, I've used my trusty Anitas craft gems.

I really dislike the Mint Green, I don't think I'll ever get through the whole bottle. It reminds me of hospital gown colour. But it fit pretty well into this theme :-)


Paint 4 nails with your base colour (your least favourite) and one accent nail in your metallic. I've painted my index finger, I always use that for an accent nail.


Once that's dry, it's time to start blobbing. I've put out dabs of the colours on a piece of plastic.


Dip one end of your bobby pin in one colour. Start by doing three or four blobs across the very top of your nail.


Add your second colour, moving down the nail. Each dot should overlap another, as that what will give you a fishy-tail effect. You will have to wipe the bobby pin between each colour, or use one for each shade.


Use your metallic for the third colour and carry on dotting down the nail.


As you reach the bottom, do a half-moon guide with one of your colours.


 Dot your other colours up to and overlapping the guide, this will kind of hide it so it isn't so obvious.


Cute huh? I think we need a bit of sparkle though :-) Do both hands, you'll need to redo your little pools as the polish will probably go quite tacky after a few minutes.


I tipped out a little pile of gems in the sea colours that I had.


Paint a thick layer of clear polish over your accent nail. Using the other end of your bobby pin, dip it in the clear polish and wait a few seconds. This will make it tacky enough to pick up a gem with the very end, but it won't stick to it. Press the gems firmly into a half-moon using the end of the bobby pin.


The size of your gems verse the size of your nail will have a serious effect on how the final result looks. But you can't control it. So go with the flow and build up some layers of coloured gems. Why not try mixing it up also?


And wa-la! (I really say that, in actual real life.) Paint the whole accent nail with a very thin coat of clear polish and then finish off your other nails the same way.

I hope you like this tutorial! Feel free to post any of my images on Pintrest, but do ensure that they link back to here :-)


Friday, 21 September 2012

Ombre French Manicure Tutorial How-To

A month or so back I posted this picture of an Ombre French Manicure that I tried.It's proved quite popular on Pintrest...(follow me here)...so I thought as I have suddenly found myself with much less to do in the day that I'd post a tutorial - I hope you like! As I have said before I love love love reading comments, whether complimentary or constructively critical. (I can take it. I'll only cry into my coffee for like, 2 days)


Supplies: Make-up sponge, French Manicure Pink by Collection 2000, White by NYC.


Paint one very thin coat of pink over bare nails. French Manicure pink is usually very, very thin and it's easy to get streaky. Try and get as even a coat as you can!

 
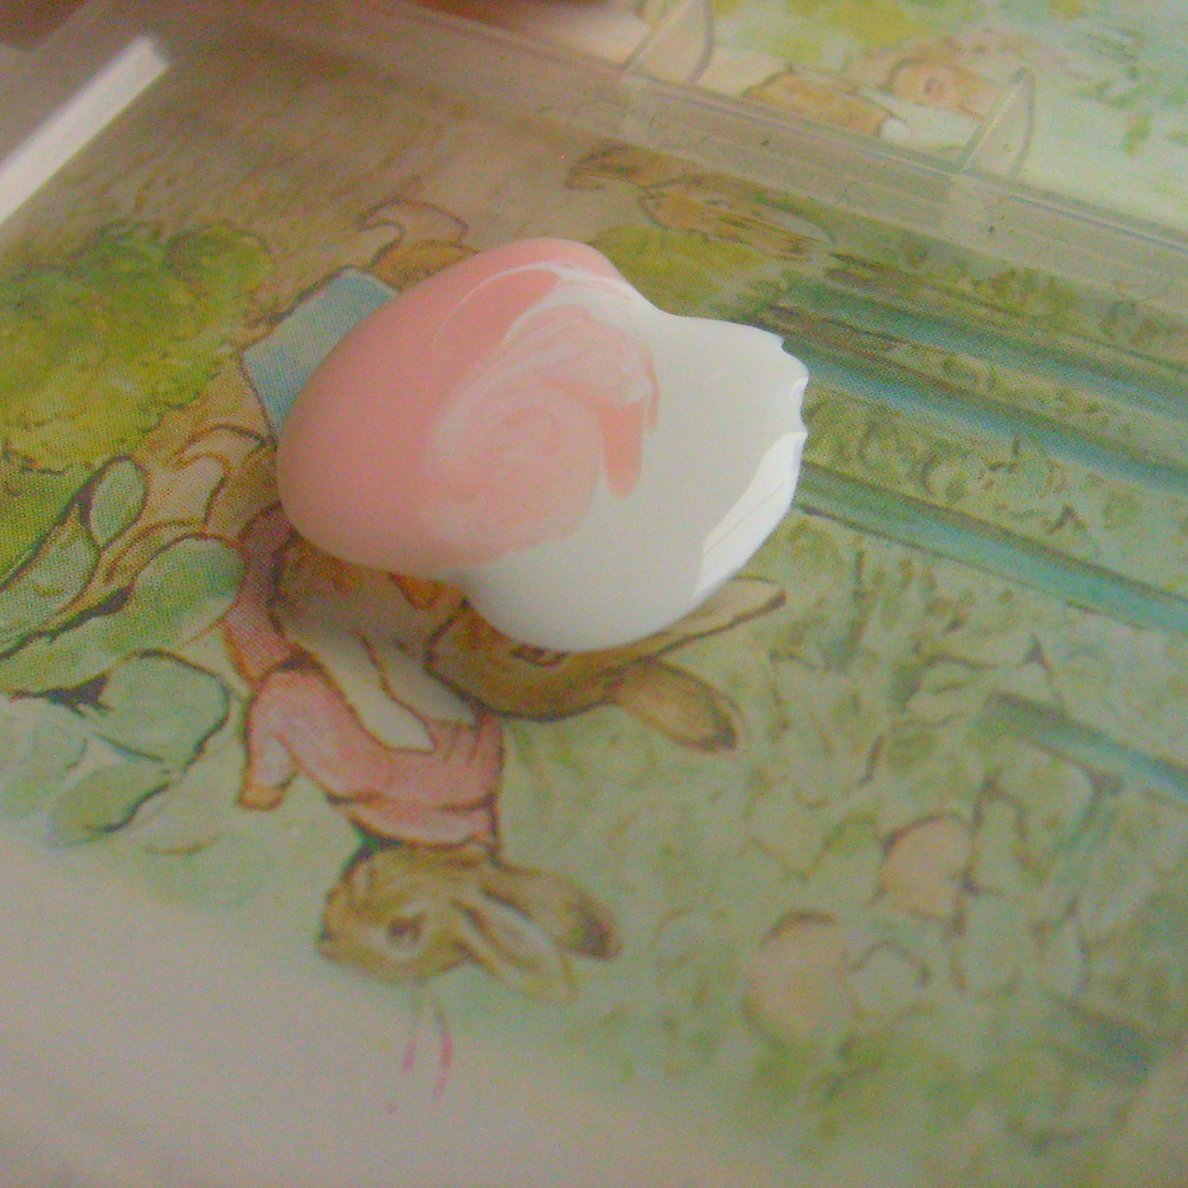
 Blob two short lines of nail polish onto a plastic base. I've used a small storage box lid. Be careful, because nail polish can melt some things with shiny, laminated coatings and will pick up a lot of it's colour. I found this out when I tried to use a sweet wrapper. 

Using a pin or earring or old fork tine, mix the two colours where they meet. The more you mix, the better gradient effect you will have.


 Press a small, dense sponge down on the polish. You need to move quickly here because the polish will dry and go tacky. Push down gently a few times to encourage the sponge to pick up all the polish.


Press the sponge down on your nail. Try to cover 2/3's of the nail. You might need a few extra dabs on the sides. Don't worry if you get some on your skin, because you can always clean up after with nail polish remover and a small brush.


Looks pretty messy huh? Don't worry! Where you see a stronger line that doesn't seem gradienty enough (I totally made up a word) you can dab your sponge lightly over the area to increase the blend effect.


Messy!


Next, dip your sponge in the remainder of the white polish and dab carefully over the tops of your nails. This will give you the pure white - to - pure pink look.


Immediately paint another very thin layer of the pink over the whole effect. 


And you are done! I think I could have done with a few more dabs of white but overall I'm really happy with my nails right no, it only takes a little while, because you can paint each new layer straight away!

I'm off to the adventure playground now to play pirates with a small noisy fellow. I hope your Friday is just as fun. x


Sunday, 16 September 2012

Katy Clouds Rainy Clouds Nail Tutorial

Yay! I've been thinking about this for a little while. I'm so happy with how cute this turned out!

I hope you like it, please feel free to comment, I always reply and visit commenter's blogs in return :-)


I used Barry M Nail Paint in Gray, NYC in White and a clear topcoat from Collection 2000. The gems I used were by Anita from the craft shop. I kind of umm-ed and arr-ed about buying them because they were 3.99 but the pack has lasted ages and I've used them for everything from nails to Christmas cards :-)

Start with a deep gray base coat. I love this grey on it's own, it's subtle and great for work, I prefer greys with blue undertones rather than taupe.
 
 
After the gray is dry, wipe all the excess paint from the White brush off on the side of the bottle, but leave the heavy blob that always hangs on the very end. I use this as a large dotting tool. Make a big white dot in the centre of your nail.
 
 
Make two more blobs on each side of your first spot. I flesh the blobs out with a few more dabs. You might need to reload the brush.
 
 
Two more large dots with the brush will form the cloud shape. You can dab a few more blobs if you want a puffier cloud.
 
 
On some of my nails I did a little extra puff to mix it up a bit. Same technique. You need to leave a big gray space though, for your raindrops at the end.


Repeat on all your nails. I found this quite hard using my left hand but steadying my arm with my elbow really helped. I never photograph my right hand!!


Use a pin or end of a paperclip to make a teeny spot of clear polish under one of your clouds. You can use the still-tacky end of whatever tool you use here to pick up a gem and stick it firmly in place on your nail. Don't worry about getting clear polish on the gem - you'll be painting over the whole thing with a top coat in a second anyway. I positioned my gems under all my clouds and used two on my thumb.
 
 
 I feel I should aplogise for the quality of these photos, my camera seems to be on it's very last legs *sadface*
 
I'll try and get some better pics tomorrow - have a great rest of your Sunday! x


Similiar Posts...