

Image maps are a really great way of giving your blog an extra boost. It's SUPER easy, and I'm going to show you step by step how I created the image map that I am using as my blog navigation menu :-)
An image map is a picture that you can click different parts of to go to different links. It's a good way of making a navigation menu on a blog, because you can use a font that other people might not have, or a series of pictures that suit your design.
1. Set up your image. I created a blank white image in Paint in the size that I wanted my navigation bar to be. Then I saved it as a .PNG file, and opened up the image in picmonkey. Picmonkey is my favourite image editing software as the fonts, customisation options and clipart suits my personal style.

2. Crop your image to within an inch of it's life. You need to cut out all additional white space. The reason for this is - it will be impossible to customise the image after you have mapped it. If you find the spacing of your blog is off after adding your imagemap, you'll need to start all over again. This way, you can always add extra space by using the 'br' tag.

Click browse and select your image from your computers files.

You will have the choice of 'rectangle' and 'custom' areas to map. You probably already guessed that the areas will be the linked parts of the image.
I'll be using the rectangle option for this guide. The custom shape is slightly more complex as you map 'points' around an area you want to link, but once you try it out, it should become quite clear.

The rectangle will appear in the top corner of your image. You can simply stretch and move the rectangle to cover the entire area that you want to turn into a link. Then, copy the link you want clicks to go to into the box titled 'link for this map'. Type a short text in the second box. This is what will show up when the cursor 'hovers' over the link. I just put in the same words as the navigation menu.

5. Rinse, lather, repeat. After clicking save, select 'Rectangle' again and a new box will appear. Move, stretch and reposition the rectangle to your second link area. It helps to have your blog up in the background so you can easily find each link you are looking for.
*** The way I 'label' my posts means that I can direct my readers to pages containing only posts they are interested in. Tag all your posts in a uniform fashion. All my nail tutorials are tagged with 'nails'. To find this link, go to the bottom of an entry and click one of the tags. This will load a page showing all entries with that tag. This is the link that I have used in my image map navigation menu ***
6. Uncheck all of the options in the Advance Tool Box (apart from the one about leaving the linkback in. It's only fair, after all - this is a great free tool!) if you don't, you will get a list of text links directly under your image map, which isn't that helpful for a navigation bar.
7. Get your code and upload your image. Click the 'get code' button and you will be presented with a page like the one below with a series of tabs across the top. You only need basic HTML code for most blogs.

You will need to 'host' the image behind your map somewhere else. Photobucket is a fast, free and easy option. You simply sign up, sign in, click the big green 'upload' button, select your image (must be exactly the same image as you uploaded to image-maps. Then just click the 'direct link' section, and your link will be automatically copied to your clipboard. You might want to put it in a notepad document for a second, as you'll need the clipboard to transfer the code to your blog.
8. Copy the entire code...and load up your blog provider. Now, I used Blogger, and the instructions here are just for my personal blogging platform. It should be straightforward to edit your own blog. You are basically looking for the section whereby you can add HTML code into your blog design layout. In Blogger, it's the section pictured below, labelled 'Layout'.
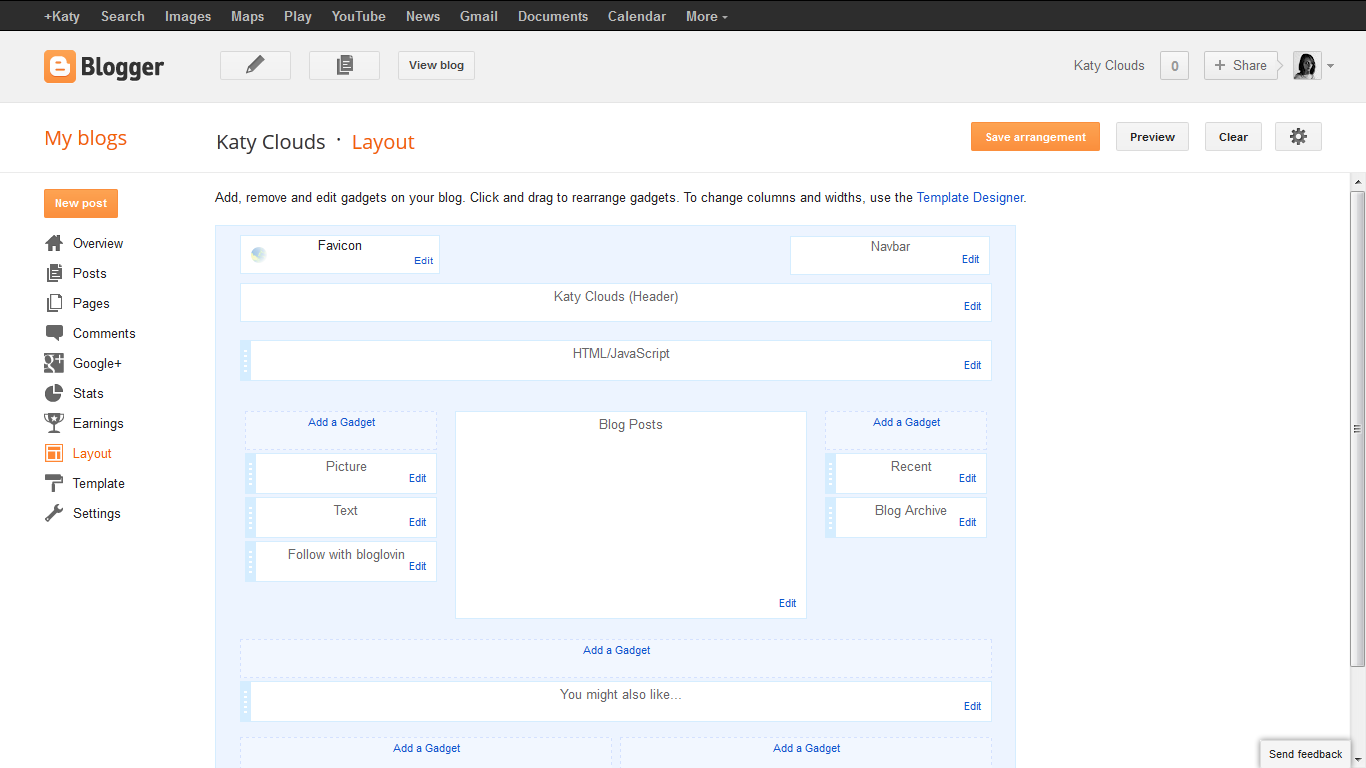
I want my navigation bar to appear directly below my banner. So I have inserted a 'gadget' (a section of coding) and located it underneath the banner section. Do this by clicking any of the 'Add a Gadget' links. You can always rearrange these, that is the beautiful of Blogger and one of the reasons that I like it so much - simple layout edits are always super easy!
When offered the choice of the type of Gadget, chose HTML/JAVASCRIPT and paste your code into the box. See the screen shot below which should make this clearer.

9. Replace the link. Now, go grab that photobucket link. See in the code where it says "img src="http://www.image-maps.com/etc etc"? Replace everything between those speech marks with your photobucket link.
10. Save and admire - Your work here is done. Check that all the links go where you want them to.
I hope this has inspired you to add an image map to your blog! I'd be happy to ask any questions or elaborate on anything that isn't clear in this tutorial, and I love reading comments both positive and constructively critical.
This. Is. Amazing. I've been wanting to do a customised 'pages' widget but I found it really hard to do in Blogger. Thank you for this tute.
ReplyDeleteLou xx
No problem Lou, let me have the link when you've given it a go!
DeleteDid it!! Less difficult than I thought it would be, your instructions were perfect! I'm so happy with how it's turned out!
DeleteI'm going to make another one for all my social profiles now, down the LHS!
Thank you so much for sharing info like this, it's really really generous!
http://www.foliesdubonheur.com/
Thank you SO much! Your post is the only post that helped me fix a question I had, so thanks! :D
ReplyDeletehttp://ahemitsemme.blogspot.com/
Well Katy, I am totally amazed, I have always wondered what this was called to even search for how to do, this is awesome and I will be using this for sure. Thank you for the tutorial!
ReplyDeleteKarren
Oh! My Heartsie Reviews
Aww what a sweet comments Karren, thank you so much!
DeleteThank you Katy.
ReplyDeleteI stumbled across this Pin and not even knowing what it was I would be looking at, found instructions for what I know have been looking for. Like Karren above I had no idea what that was called but it's exactly what I wanted to know how to do. It's far too late (early in the morning?) to try this out at the moment but I am excited to give it a go once I get some sleep.
Thank you!
I am trying to map an image to create a new page in my blog on blogger. How do I insert the picture that I have mapped. When I click on insert image under my new page, where do I go from there? I tried to insert using the URL, but it doesn't work. Help! I'm stuck!
ReplyDeleteKaty, I was looking all over the net trying to find what you so clearly provided. Simple instructions on image mapping for a blog. I use a wordpress.com account, but your explanation pointed me in the right direction. thanks, Here is the link: http://frodothesheltie.com/kindle-e-book/. It's an image map pointing to the various Amazon locations for people to buy my new kindle book: Thanks again so much. BIG HELP
ReplyDeleteGord
Thank you Katy, very helpful.
ReplyDeleteThis has been soooo very helpful, but I'm having one issue, and I wonder if you can help me? I pasted everything into the gadget as you suggested, and I placed the gadget way at the bottom of my page. Now a copy of the image is showing there also! Is there a way to make this gadget invisible? It seems sort of silly having a copy of my header way down there like that. Thank you!
ReplyDeleteTHANK YOU SO MUCH! I've looked at tons of tutorials on this tonight and this one was the most helpful :)
ReplyDeleteTHANK YOU!!! I've wanted to do this for months and couldn't figure out how! :-D :-D
ReplyDeleteReally want to do this, but it's not working for me is it because I am on a mac? I go to image-map.com and then upload my photo then the photo just shows up on the screen no option boxes and none of the boxes with options that you have here. Am I doing something wrong? Or do I have to register and pay for it/?? please help? letstalkmommy@yahoo.com
ReplyDeleteKaty, you are simply amazing for supplying this info! After trying for days, I came across your post and it has now taken me ten minutes to add my image map to my blog! THANK YOU THANK YOU THANK YOU!
ReplyDeleteRespect and that i have a neat proposal: Where To Loan For House Renovation house exterior renovation
ReplyDeleteThank You and that i have a neat present: How Much Are House Renovations Stardew Valley home renovation designers
ReplyDelete