Showing posts with label diy. Show all posts

Friday, 1 June 2018

Light Up Festival Fancy Dress Crown DIY

First things first, Hogsozzle was a blast. You'll be sick of me going on about it if you follow me on any other social media but I just want to take a minute to say I have the serious post-festival blues this week - I'll be doing a full post with loads of photos and thank yous to the incredible crew and stalls early next week.


Right now I'm here to share a DIY for the crown that I made to pull together my Snow Queen costume. I didn't get a decent picture of the whole outfit, it was pretty much just a white top and a big fluffy waistcoat other than the crown anyway, but I do have a lot of pics of me loving life in my light-up headpiece!


I have to say that my usual attempts to create festival fancy dress don't tend to go this well. Right now, my crown is sitting next to me in almost perfect condition, still lighting up, ready to rock another event. This never happens to me. Usually anything I made falls apart instantly, gets lost or broken or simply begins to degrade without explanation. Not this baby. The materials are relatively easy to source with the exception of the plastic base which I was lucky enough to find behind my boyfriends sofa. The actual plastic I used is something to do with digital printing, it's about 3mm thick and matte white. I've found something similiar on Amazon as an alternative and linked in the materials list below.

The instructions below are for creating a Snow Queen crown similar to the one I've made, but you could easily change up the colours and additions to create something that suits your own costume needs!

You will need:

Heavy duty plastic sheet (try this one in 3mm or 2mm if you don't have a craft knife)
Sharp scissors or craft knife
Gluegun
Sellotape
Metal ruler
String of battery operated lights
3 meters of 1cm wide velvet ribbon
2 meters of thin silver cord
1 meter of 3cm wide binding tape
5 medium pompoms
1 large pompom

First, measure your head circumference and add two inches. Use the measurement to draw a strip on the plastic (obviously using one of the straight edges as a guide and to reduce wastage!)

Mark an inch off each end, this will be where you join the crown together.

Mark the centre point.

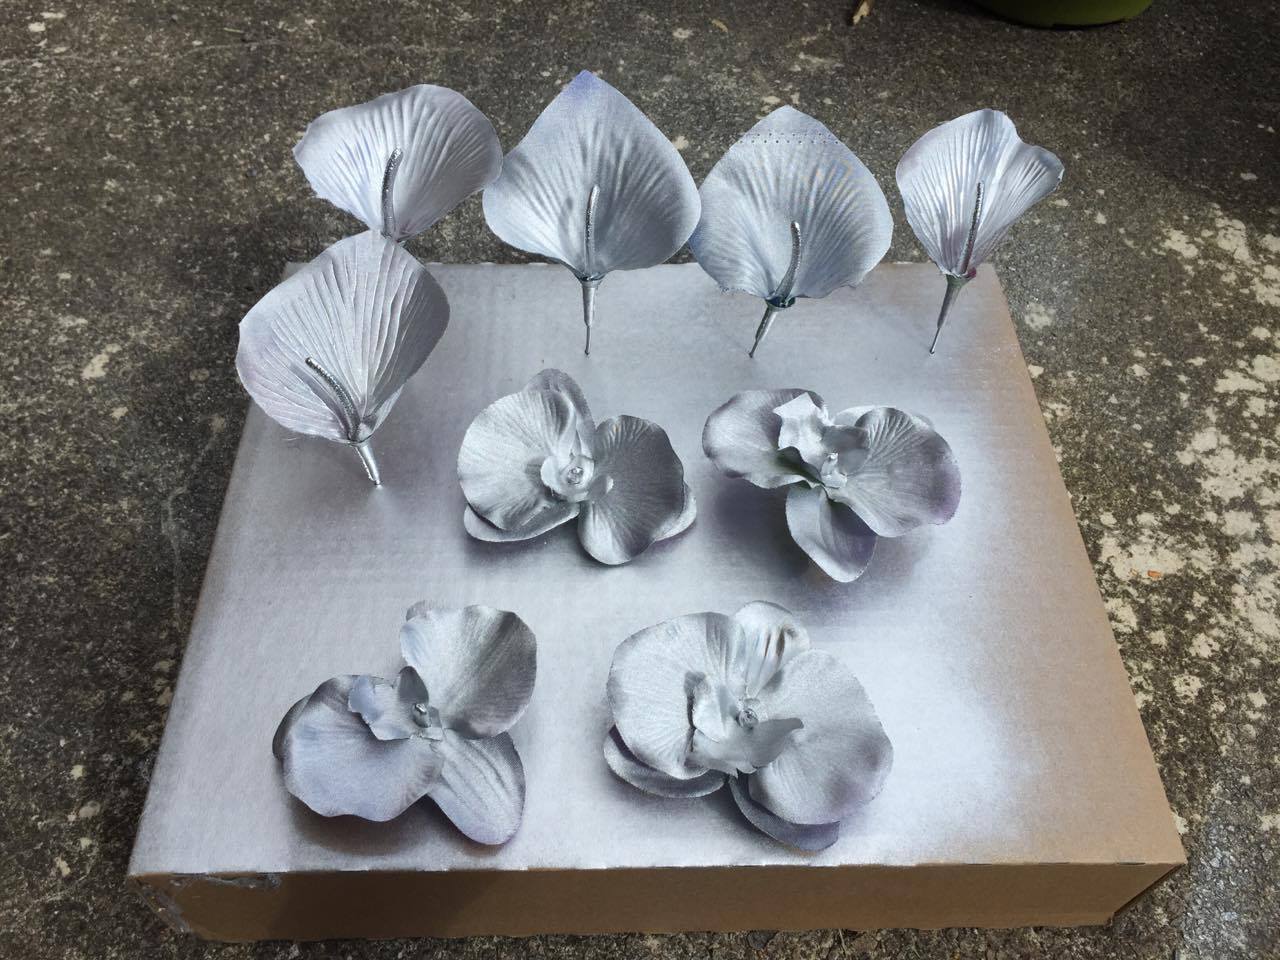
My centre spike was 4 inches and the spikes on either side were 3 inches. I marked them off with a metal ruler and then drew another line 3 inches higher to use as a guide for the top of the spikes.

Once everything is pencilled in, start cutting. The plastic I used was just about thin enough to cut with normal scissors but next time I'll use a craft knife for a cleaner finish.

Now it's time to decorate! Use the binding tape for the headband. I measured the width of my band so that the binding tape would fold very slightly over and conceal the white edge.

Next it's time to add the lights. I started at one end and worked out there was enough for three lights per spike. Move slowly, securing the wires away from the base of the bulb with a bit of glue. Use your metal ruler to press hard onto each glue spot, this will harden it quicker and leave a flat finish.  Leave the battery pack loose with some spare wire for now.


To wrap the spikes I secured the velvet ribbon on the bottom and slightly to the side with a blob of glue and wrapped it all the way around, covering as much white plastic as possible and making sure to wrap the wire of the lights tightly to the spike. The ribbon is secured with a tiny bit of glue at the top - use the ruler to harden and flatten as before.

Do the same with the silver ribbon, wrapping it round the spike to fill in any gaps. You could add another ribbon or thread here if you wanted but as my spikes where meant to represent icicles I didn't mind the flash of white showing through. You could also paint the plastic with acrylic paint before you start wrapping it.

Use a small pompom to conceal the joins of the ribbons, thread and binding tape.


Finally, I cut a hole in the big pompom and squirted some hot glue into the hole, wedging it hard onto my centre spike. I was most worried that this would come off but it held fast and I don't think I could get it off if I tried!!

I joined the two ends together with sellotape which I also wrapped round the battery pack. This means I could lay the crown flat if I didn't want it to get damaged on a long car journey and also makes it easier to change the batteries.

Done! I would LOVE to know if you try this method to make your own light-up festival crown and see pics of your finished piece! I'm so proud of this that I'm tempted to make some custom ones so if you don't have the time or materials get in touch on twitter or email me.


Wednesday, 17 May 2017

Use Biodegradable Glitter This Year At Festivals!


Less than two weeks to go before Hogsozzle (click for their website and tickets!) and I’m spending the majority of my spare time thinking about how I can possibly apply enough glitter to myself to satisfy my craving for sparkle and shine. Did you know that humans are attracted to sparkly things because of an in-built instinct to head towards water sparkling in the distant? Glitter fact number 1! 

Inspired by various glittery companies popping up round the country at festivals and, more I’ve noticed, at blogger events, I started doing some research into glitter and it's effects.

 I popped along to the BooHoo A/W Press event through work, I don’t blog about fashion much as I’m not very trendy. Also, I say things ‘I’m not very trendy’ a lot, which makes me even less so.  I was gutted to have missed Go Get Glitter, who seemed to turn up just as I had to return (slightly drunk on fruity gin cocktails and having met Stacey Solomon) to the office. I did manage to get a glitter bun hairdo from The London Makeup Academy, but they didn’t use cosmetic glitter, instead spreading a thin glue over my parting which I was terribly worried wouldn’t come out but a good hot shower had the glitter specks running down the plughole…


…which brings me nicely to my main point.

 I’m worried about microplastics and you should be to – this year, we can all do some tiny things to protect our planet just a little more than we have been doing. Here are some facts about microplastics, which I cite from The Royal Society Of Chemistry but there are hundreds of articles on this subject across the web.


Microplastics are pieces of plastics less than 5mm in size. Nanoplastics are as small as 1 – 100nm.

These plastics are small enough to avoid filtration and end up directly in the sea or other water supplies. They are also small enough to be consumed by fish and birds and can build up in the body, causing problems such as infertility, deformities, growth problems and death.

They are present in many of our cosmetics – 680 tonnes of plastic microbeads are used in a year in the UK alone – luckily, many companies are trying to find other ways of adding exfoliating properties, they can use coconut husk or other natural fibres instead.  Keep an eye out for silicones and polymers  in the ingredients if you want to avoid this. 

Plastic microfibers in clothing are also a threat to the future of the oceans – they are too small to be caught in your washing machine filter system.

The main threat is still the incorrect disposal and permanent storage of waste – the best way to help is to recycle as much as possible and try not to use too much plastic – it’s getting easier every month as more companies catch on to peoples feelings about this subject.


Through fish, the microplastics also have the potential to re-enter the food chain, studies on how this could affect humans haven’t had time to gather quantifiable data yet, but common sense tells you, it can’t be good.


Some companies are doing something about it...

Johnson and Johnson recently made the sticks on their cotton buds out of paper, instead of plastic. Cotton buds flushed down the loo can cause an environmental issue as well as asewage one so this is a great move on their part and gives consumers a choice. Read more about their campaign to reduce plastics here.

Lush have removed all plastic glitter from their products and have put out the following statement:

"we’ve avoided microplastics by switching to mica and mineral glitter, as well as natural starch-based lusters. Our ingredient suppliers have worked hard to develop these plastic-free alternatives for our products, all of which are safe for the environment."


There are also companies springing up that promote the biodegradability of their glitter as a selling point - and it definitely is! This year, I'm making a pledge to ONLY use biodegradable glitters ion our festival costumes and I'll be encouraging my fellow revellers to do the same. 

Most cosmetics and craft glitter is made from non-biodegradable materials such a copolymer or aluminium foil – this means it’s a danger to birds, entering the food chain or water system through their digestion of the plastic glitter particles.


Loving life at a festival, coated in what I am certain was not bio-degradable glitter.
Most companies that sell biodegradable glitter will shout it loud and proud, so it isn’t hard to find. Avoid using craft shop glitters at festivals, or cheap ones in huge packs from Amazon. Chances are these aren’t going to be biodegradable, if it doesn’t say it is, you can assume that it’s not. I was really disappointed whilst researching this post that post of the companies that I love for their glitter bums, glitter tits and general sparkle are manufacturing non-biodegradable glitters or purchasing their components from sources that don't supply information about their friendliness towards the environment. I'm going to attempt not to feature any of these sort of brands this year, whether that be here on my blog, or on my face when we are getting face-painting or hair glitter. 


Coachella Looks by Go Get Glitter


These types of glitters can be more expensive, but you usually get a better quality product that you get through other sources that won’t irritate your skin (craft glitter can be very rough and scratchy on sensitive skin)

Here are two companies I have found that provide biodegradable glitter and I would love if you would pop in the comments if you know of any more!

Go Get Glitter - one of my favourite Instagram accounts (click here!) and popping up at festivals all over the world at the moment, these guys state that their glitter products are 100% biodegradable on their website here 

MGMA is a Bristol based company that sells biodegradable glitter and promotes it's use on the web and in person, I haven't had the chance to try out their products yet but I'll report back when I have done! Click here to visit their Etsy shop 


And if you click here, you'll find some ways you can make your own glitter, although I haven't tested this out yet!

Later in the week I will be sharing all of my moodboards for this years Cosmic Disco themed Hogsozzle, I've got all the girls dressing up this year and I can't wait to share the pictures afterwards! 

Katy xx

Wednesday, 26 October 2016

HELP! My Christmas Ornament DIY Went Viral And I've Been Trying To Make The Most Of It Since 2010


Christmas - the most shareable, pinnable, instagrammable time of the year. For bloggers and pretty much anyone in marketing, it basically takes up around three to four months of your life. There are a million articles and informative podcasts and youtube videos about how to make the best of the world's interest in crafts, baking and cheese at this time of year- with the ultimate aim of creating some content so awesome that it gets pinned a billion times and drives traffic to your blog for years to come.

I did this - but I've struggled to capitalise on my creation for the last six years and now, I need to know whether it's time to just give up, and move on, or if there is something I can do to get the traffic that gets so interested in this DIY to come here, instead of the web address that's been attached to it since the beginning.

In 2010 I was writing on a different little space on the internet. I'd been blogging for quite a few years by this time and I knew what I was doing with photographs and sharing my content, I was getting around 100 hits a day, not amazing, but it was going steadily upwards and I was making jewellery for an Etsy shop that I've since shut down. Because of this, a lot of my social network at the time were crafty types and a lot of the content I was creating was craft related. When it came to Christmas 2010, I was at home with my little guy, I'd just been made redundant and I had a lot of time on my hands. I created this:


I popped the DIY up on the blog and did the usual round of promotion, a post on twitter, Pinterest and on the Etsy forums. Instagram wasn't as huge a thing back then and I hadn't quite worked out how to best use it to promote my content. It's since been pinned 4,700+ times - linking back to the original post on my old blog.

I have tried everything I can to capitalise on this creation in my new space, here at katyclouds.blogspot.com. I moved most of the content over to here when I migrated to the new username but because the original Pin linked to the old blogspot, traffic is still being driven there by Pinterest and it drives me INSANE. Hits on the old blog go up to around 3K a day as we get into prime Christmas crafting time, and the old article still gets shared regular as clockwork by all the major crafty DIY sites and blogs. It would basically be a dream come true for traffic and my profile in general - IF the traffic was going to the correct blog! I haven't updated the blog over at the old address for nearly 6 years - I don't want to use the username anymore, I want to use this username and keep the content here. I want traffic to come here, driven by the awesome DIY I made 6 years ago and all the other Christmas, crafting and digital marketing / social media help I've posted over the years.

As someone who works in digital marketing and has done for nearly eight years, I feel like this is an issue I should be able to solve and it frustrates me no end that I can't. That's why, dear reader, I am calling in the big guns and asking for help. Here are the things that I have done to try and get the traffic coming here:


  • Reposted the entire article on this blog under the same username and repinned it. The pin has been shared 47 times. That's 1% of the times of the original. You can read the article as reposted here by clicking here ➡click here
  • Put a big link up at the top of the original post directing traffic to this space
  • Put a link at the top of the new post
  • Set up an automatic divert on my old blog - with a large image that should have just enough time to load before the viewer is diverted. I think I still lose about 50% of traffic as they lose interest (or panic because scammers) - although towards Christmas hits on this blog do go up with the majority of traffic coming from the original blog.
  • Repeatedly over the last six years reposted and resubmitted the pictures and article to many crafting sites, repinned it hundreds of times myself, shared it on every social media platform imaginable
  • Written this post in an attempt to find a final solution - or give up and accept that I can't make the most of the interest in this DIY on a new blog.

I can't change the link on the original Pin, and besides, it's too late. Perhaps I have no choice but to watch in resigned pride as the hit count on my old blog goes through the roof every Christmas and accept the fact that I cannot get that traffic here. Or perhaps, someone out there knows the answer. Perhaps someone has helped a business or individual solve a similar issue and wants to share with me the secret to diverting traffic from one ridiculously popular source to another. I have lots of DIY content here for people to enjoy. I have the full DIY for the Christmas bauble. Which, by the way, fell apart after two days because I didn't use strong enough glue and no longer exists - in case you thought I  got it out every year and cried over it, weeping for my lost traffic. I'm only saying this because I would definitely do that if it hasn't have been such a shoddy DIY in the first place.

So, digital marketers, people with ideas or Pinterest experts - how can I make sure that the traffic comes to my blog here this year? What are you tips and suggestions for driving up the traffic of this here blog based on this one successful DIY I created 6 years ago? Or, I feel this might be the one, is it time to let go of the dream and concentrate on creating more Amazingly Awesome DIY's that will bring readers here themselves. Please drop your thoughts and ideas below, I can't wait to read them :)

Thursday, 26 May 2016

DIY Cosmic Festival Flower Crown + Last Minute Hogsozzle Tickets

Costumes are chosen, tents are being checked and supplies purchased- it's two days until festival season 2016 begins!

I spent the last few evenings knee deep in glue and fake flowers. This isn't a DIY really, more of a how-I-did-it, without a completed photo, because I'm saving that for my big outfit reveal on the blog after the weekend! However I hope the mistakes and ideas that I document in this post may be of use to you if you are thinking of creating a magical headpiece for your own costume...


Fake flowers - mine were from a discount store, super cheap!
Glittery Foam Stars
Glue
Silver Spray Paint (not shown)
Wire Cutters (not shown)

If I was doing this project again, I would also make sure I had:

Florists foam
Silver fabric tape
A less funny shaped head.

I started off by cutting the stems off the flowers that I wanted to use, saving a 10cm piece of wire on the end to wrap around the band.


I also cut all the flowers off at the joint on the orchid blossom - the bendy stalk is perfect to create the frame of my headpiece.


I also pulled the leaves off, most of which were just attached by a small plastic ring. I saved the leaves and unused flowers for another project I haven't thought of yet. I realised immediately that I should have purchased some florist foam to stick the flowers in whilst I spray painted them - what a rookie error! Luckily I had a shallow cardboard box lying about which I spiked the flowers into, spaced well apart but I'd definitely recommend the florist foam if you are attempting a similar project.


How cosmic do they look?! I was kind of over-excited at this point because I wasn't sure what the spray paint would look like, or even if it would work.  It had a metallic lid, but the sticker said "This lid is not representative of the finished effect" so I was worried it would be very matt. Actually, it's pretty shiny, especially on the plastic stems and stamen, and the cheapo fabric flowers took the paint like pros. I did three light coats and used one of the discarded long stems to lift the top layers of petals up, so none of their original colour would show through. I also sprayed the ends of the stems on the other side of the box and the long, bendy stem from the orchids.


I taped the bendy stalk round to the perfect head shape for me (I have a weird shaped head. I discovered this today.) and then started twisting the lilies into place, starting at one side.


I added three of the glittery foam stars, they are perfect because the foam sort of molds to the shape you want it to meaning it tucks neatly around my head and hides the joins and the dodgy bits (see below)

Once I'd taped the wrapped areas with thick fabric tape for extra stickiness and to avoid the ends poking into my brain, I wished I'd used silver tape instead of the sticky, plastic, yellow horror that I selected. I had the bright idea to spray paint the inside but the paint did not want to stick to the yellow plasticky areas so I ended up having to rush out and get silver tape for a better finish.


Here she is :) It's not quite done, a few finishing touches to add. I'll have it be-dazzled and ready to shine along with my costume from Tickled Pink Fancy Dress and my spray painted wellies tomorrow night!

If you haven't got a ticket yet, there's just 16 left at the moment of writing. Check this link to see if you've missed the boat for festival funtimes - if your tickets are in hand, see you at the Sozzle!

Katy

P.S

I'm taking over The Turner Brothers Instagram feed as soon as I wake up tomorrow until we pack away the last tentpeg on Monday and wind our hungover way home. I'd love you to join me there! Follow along on their Instagram by clicking here.

Tuesday, 12 February 2013

Padded Storage Box DIY

Boring old shoeboxes be gone! I've been jazzing mine up in this super-easy way, adding pops of pattern and fun to my living room :-)


I whipped this up in about half an hour, it now has pride of place on the shelf underneath my coffee table. Let me know if you give it a whirl!


You Will Need:

Shoebox or other cardboard box with a sturdy, lift off lid.
Piece of wadding cut to the same size as the life
Piece of fabric cut two inches larger all the way around
Glue Gun
Pen
Ruler
Buttons
Tape Measure
Needle & Thread


1. Please ignore the fact that I still have my Glitter Gradient Manicure on! Drawn across the diagonal on the top of your lid. Measure the distance from the corner to the centre and put a dot halfway between them.


2. Wow, that's a bad quality photo! Sorry about that. Why does my needle look so odd? I stuck it down into my gluegun barrel. Yup. Use a big needle to punch a hole in the lid. Mine was sturdy enough to withstand a hole being punches but you could put a blob of bluetack on the underside if you think your lid might cave in.


3. Sandwich your wadding between your fabric and the lid. Line it up so there is an even amount of fabric on  each side. Then you can snip off the very corners to reduce bunching later on. Spread a line of glue on the inside rim of your lid, and tightly fold the fabric over. make sure you pull tight enough for a smooth lid but not so tight that you totally flatten the wadding. Pop a blob of glue in each corner and pull the corner in.


4. I changed my buttons at the last minute for these tiny flower ones. Poke your needle through the hole on the underside, through one hole in your button (see the picture above) and then down again through the second hole. It's a little struggle to find the hole again because you are going in blind, but give it a wiggle and you should be able to pop it back through. Tie the two ends together tightly for a quilted effect.


5. Looks cute huh? Check your lid fits on and snip the ends of the thread. Fill your box with stuff that you want to store! I've filled mine with small plastic dinosaurs and cars :-)


The lighting has been SO bad for taking indoor photos recently, so I am sorry about the quality of these shots. I hope you like the DIY anyway!

Monday, 11 February 2013

Picmonkey - Awesome Tips & Tricks

Picmonkey is a free web-based photo editor with a bunch of great tools and effects to enhance your photos. I use it as my main image editor and I thought it would be fun to share some of my favourite things that I have discovered about it. There are hundreds of ways to combine the tools to give a more professional finish to your images. Click any of the screenshots to get a bigger, clearer view.

All the tips here are available for non-Royale (their premium service) users. This includes fonts I have used and all the effects, overlays and tools. I am a Royale member though, and I highly recommend it, loads more fonts and amazing stuff becomes available to you, and it's under £3 a month. (I should point out that I am not affliated with Picmonkey. This article is my own opinion and it's my own money that paid for the Royale membership)

So I have three main tips and a bunch of little tricks. If you have any questions, please feel free to pop them in the comments I would be happy to clarify anything. I'm also really interested in seeing other Picmonkey tutorials so don't be afraid to link yours!


1. Starting with a blank canvas
Useful if you are looking to make something from scratch. I used this technique to make both my navigation bar (Those tabs with sections of my blog) and also my banner.
So easy that I wouldn't even call this a tutorial. Simply open any picture of a size equal to (or larger so that you can crop it down) the final image that you want.

Open the 'Overlays' menu item on the left, select either square or rectangle. Once it's placed stretch it big enough to cover the whole image and then some.


Use the toolbox to select a colour for your blank canvas. White is standard. You can then crop this to the size you want. See up there where it says 'Open', 'Save' & Share? Then there are two small arrows (undo and redo). The next is 'Flatten'. It merges all the layers in your image. So instead of being the original picture with a white box on top, your image will simply be a white box.
2. Jazz Up Your Banners (Layering Overlays)
I've spoken a few times about using a header image to show as your thumbnail on whatever sites you share your blog. You might like to make an image for anything, and want some text on it. Picmonkey offers a large range of overlays and one of the cool things you can do is layer them over one another to give a more professional polished look.


Start with the image that you want to add a banner to. This might be a blank canvas or an photo like above.


Open up the banners section and choose one you like. This also would look great with any of the geometric overlays. Be aware that it must be just one section - the banners with more than one solid piece won't work with this layering technique.

I've faded out the bottom overlay to blend it more into the image. Nice huh? I used a 50% fade. Next, duplicate the overlay by right clicking and selecting 'Duplicate Overlay'. Make it a bit smaller (trial and error will help here!) then think about colours. I used the light blue shade visable in one of this beautiful Morrocan light's shade. It's not immediately obvious, but if you click in the box that arrow is pointing to, your cursor will become a colour dropper and you can select any colour from your image. This is a great way to get a fully cohesive look.


Use your cursor to move the new coloured banner over the top of the first one. You can experiment with layering three or even four overlays together, altering the fade and colours with each. Position it so there is an even border. Cute!


I like to use this method to make banners for my text.
3. Funk Up Your Text - How to Add a Drop Shadow Effect
I wish that there was the option to add drop shadow and perhaps even an outline glow to the text in Picmonkey, but I've figured out how to DIY the drop shadow. This works with any solid overlay too!


Chose your font, click 'Add Text' and type what you want to say. Lobster Two is one of my favourite free fonts.


Right-click and duplicate the overlay, just as we did before. Now, the first text will be your shadow and the second your actual text. If you want your text to be black you'll need to make the shadow text a deep grey. Otherwise change only the colour of the top text.


Move the coloured text on top until just a teeny bit of the shadow is showing. It's really easy to adjust the angle of the 'lighting', just move around the top text until you are happy.


These little 'dings' to add a bit of sparkle to text - don't be afraid to experiment with all the options! 
Because it's sometimes a hassle to get the shadow text in the right place to start off, I like to make this on a white background (see above) and then crop it right down so there is no additional space. Then I open up the image that I want to add the text to, and use the 'Use Your Own' overlay option. You'll be able to load up the ready made shadowed text and adjust it's size and position as a complete object. Easy!

I hope you had a lovely weekend! I had a great birthday, and I'm doing well with my 29 photos challenge. Are you following me on instagram yet?

This week I have a Valentines craft project that I've been working on for weeks, aswell as more information about my e-course on Social Media for Jobseekers :-)

Saturday, 9 February 2013

Glitter Gradient Manicure

I wanted my nails to match my sparkly shoes and sparkly mood yesterday as I went out to celebrate my birthday with my favourite friends. When I happened upon Rimmel's Disco Ball polish I suddenly thought that glittery tips would be a fun direction :-)

My first nail tutorial in ages! Click here to see other tutes that I have written.


The idea is to make it look like you have dipped the ends of your nails in glitter, this works with longer square or oval nails, I hope you'll give it a go!


1. Start with a base coat of a bright colour. This look also looks fab with neutrals! You'll need to find a glitter with a sparkle that matches your base coat.


2. Here's a close up shot of my glitter. Disco Ball by Rimmel is a lasting finish shade and I chose it because the silver glitter has a blue sheen.


I was a little disappointed with the distribution of glitter in the base. This polish offers a very subtle look with just one coat and none of the slightly bigger pieces that bring glitters out of that retro, 1990's look that they can have sometimes. The blue I used is Barry M Cobalt Blue 291.


3. I would highly recommend that you wait for the base coat to dry thoroughly before moving on to the next step - you're going to use a whole bunch of thin layers next and you'll greatly reduce drying time if you wait at least 20 mins between base and glitter. Paint just your tips to start off. If you have a glitter with some bigger pieces, use your brush to pop them in this section. I painted about the same size area as a I would with a French Manicure.


Here is a close up of the first layer of glitter. One of the really awesome things about this manicure is that because you are layering lots of polish at the tips, you reduce the risk of a breakage during the wear. I know I have a split in one nail so I still have this design on right now.

 
4. Wait five minutes and then do another coat of glitter, this time going a little further down the nail. You can see from the two pictures above how much extra needs to be painted with each coat!


5. For a finely dispersed glitter like this one, you will need to do about 5 coats over all. Make sure the layers are thing or you'll get a gloopy final look. Bigger glitter will not need as many coats, I have Barry M Rose Quartz which I often do this manicure with over a neutral base and it takes 3 coats for the tips to look totally covered.
 
 
Use a top coat or you'll have a grainy, bumpy finish!
 
Hope you love this fun sparkly look, are you going to give it a go? 

Similiar Posts...