All I want in life is sequins, biodegradable glitter and my friends in a field - four weeks until HOGSOZZLE!! (buy your ticket here)
We can't wait and I'm starting to try and put together some outfits for the occasion that I can add to the ridiculous amount of festival clothes I bought last year and create some super-memorable ensembles. I've put together a wishlist which I'll add to and edit over the next month and hopefully beyond - I hope you will find something that you love...
Amazing right? Bookmark this page as I'll be adding lots more items as I find them online and these sell out. I'd love to know what you think, if you make a purchase from my list or your favourite online destinations for festival garms, please leave a comment below, or hook up with me on Instagram here.
Katy xx
- This post contains affiliate links

Showing posts with label fashion and beauty. Show all posts
Showing posts with label fashion and beauty. Show all posts
Tuesday, 24 April 2018

Friday, 2 February 2018
Why Do Brands Take Influencers On Expensive PR Trips?

What a week for new beauty releases! I've seen the most insane PR packages and trips. I honestly love how fast-paced the beauty industry is moving at the moment. I spotted 4 separate 'blogger' or launch events happening yesterday across my social media feeds and they each looked their own kind of incredible.
When launching a new product or store, introducing a new face or having a rebranding, the current preference for glitzy, no-holds-barred events is a part of a trend called Experiential Marketing. It's been predicted as being 'big' for several years on digital and tech blogs but it's taken some time for brands to get used to spending their budgets in this way and so we are just starting to see something really awesome happening in the sphere of Influencers. Brands are beginning to understand that not every aspect of marketing can be measured in a quantifiable way. Experiential Marketing is about giving consumers an experience that will increase their propensity to purchase, even become an advocate for, the brand. In turn a wider audience is then exposed to positive feelings about the product. This snowball effect is extremely valuable!

At the Benefit Cosmetics #raiseabrow event last year
I was inspired to write this post after I saw quite a bit of moaning on Twitter. Two nights in a country hotel for a new cleanser? The Maldives? For a MASCARA? How can this possibly be beneficial for the brand and why are they splashing out thousands on a very small minority and then charging a high price for the product when us mortals have to purchase them?
Brace yourself, sensitive snowflakes.
If you are going to work in social media, expect brands to pay you for your content and ideas and promote yourself as an expert in the subject, you need to know your shit.
I'm really surprised by some of the people I've seen negatively commenting on bloggers attending events, especially when the general mood of the blogosphere finally seems to be turning in a 'support each other' kind of direction. So I've written below some of the ways that these launches can benefit the brand in a much wider way than just promoting the individual product and how it benefits you too.
Brands have had to completely change the way that their marketing budget is allocated in the last three years. From point blank refusing to pay bloggers to signing up content creators on £100,000 contracts, things have gone from zero to hero for those of us that love to write about and photograph our lives. When I first started working in Influencer marketing, I was convincing decision-makers of the three ways that working with Influencers could help to grow their business.
- Increasing the number of followers their brand accounts had
- Raising general awareness of the brands existence
- Direct sales (became a lot more relevant with the advent of Instagram Stories 'swipe-up' function)

At the launch for Deciem x ASOS
Each of these desired results has certain ways it can be achieved - for example, if you want to increase your follower count then running a contest that involves following that account would be an ideal way to achieve it.
So, we have all these ways of creating campaigns, mixing and matching your desired results with A/B testing of audiences and content. Brands usually have to select what they want from a campaign.
Experiential marketing does all of this and more.
But what brands really want these days is for their fans and users to be creating content for them, independently. This is the holy grail of online marketing in the current climate. Imagine you are launching a product and you've given it a kooky hashtag. If you check that hashtag daily, you want to see people tagging your product in their images. In the case of beauty brands, this is so valuable because of the possibility of using so many different products in one images. You could easily feature 15 or so brands in one picture of your made-up face and tagging with the brands individual hashtags is the first step towards getting that brand to notice you. If they notice you and your image is of a high quality, you might get shared on their page. Boom, 4 million people are looking at your photo, This can have an earth-shattering impact on your own follower count.
If a brand seems to be sharing a lot of Influencer's content to their audience, sending out amazing PR packages and taking bloggers on holidays that most people can only dream of, it becomes aspirational to be noticed and featured by these brands. This in turn makes their products more desirable, as you aren't going to be featured on Kylie Cosmetics page wearing a knock-off dupe liquid lip. For those bloggers that don't actually take pictures of their face but create elaborate flatlays and studio set-ups - the same goes. They need to buy the product to create the content. Then their followers see them buying and recommending the product and go out and buy it too - this is where micro-influencers fit in and play their part in the campaign. Essentially, creating content on a brand's behalf in exchange for a potential feature.
This is the crux of Experiential Marketing - for the cost of hiring an aquarium for the day and giving away some of your product in mermaid packaging, you can create an experience that gets shared millions of times, something that isn't always possible to get when paying individuals to create content - although that's obviously incredibly valuable too!
One of the negatives I've seen so far is that EM is more difficult to measure. I don't know how brands are going to be analysing whether the thousands and thousands they spend on events with spaceships coming from the roof, covetable merchandise (who else wanted a Too Faced sunhat last summer?) and masterclasses added to their sales. This will be really interesting to watch and research. I'll be keeping an eye on new launch hashtags and how long it takes content to start getting created by aspiring make-up artists and micro-influencers.

The Boohoo Spring/Summer Press Day 2017
I LOVE the movement towards this type of promotion and PR. It means brands have the opportunity to really infuse their personality and their ethos into launches, making it an exciting time to work in the beauty (and fashion and lifestyle and fitness...) industries. Once the longer term effects on sales and brand awareness can be measured I believe there will develop a whole secondary industry dedicated to putting on these type of events with the most success. In the meantime, the only way anyone gets to be involved, whether it's an all-expenses paid trip to Bali or a pool party in central London, is to create amazing content - moaning about it on Twitter won't get you anywhere at all.
I hope this has given some background as to why brands are creating these experiences, I would love your comments below on amazing events you have been to and how they made you feel about a product or brand - please do leave a comment.
I'm currently available for consultation and digital content projects. You can email me on katycloudsofficial[at]gmail.com or tweet on [at]katy_clouds
Wednesday, 11 May 2016
Festival Fancy Dress - Mermaid Inspiration for Hogsozzle 2016

What were your childhood dreams like? Floaty and hard to remember? Vivid and packed with sights and sounds from your everyday life? Did you dream about living a completely different life? In space or under the sea?
We did :)
Carrying on my mission to get more involved in festival fancy dress this year at Hogsozzle, I've roped some of the girls in our usual troupe into dressing up. We have a mermaid, an alien, a red Indian and possibly a pirate so far - I'm still working on the others! One of my very favourite friends Hayley will be making waves in a mermaid-themed outfit. She's always been the most difficult to convince into a fancy dress costume, but I was shore the lure of festival fun times would get her donning sparkles and diy-flower crowns with the rest of us - and she's taken to it like a mermaid to water.


Seashell Crown via Polyvore, Shell Crown - Chelsea Flower Crowns on Etsy, Dreamer Mermaid Crown - Wild & Free at FreePeople, Shell Hairpiece - CDeityDesigns on Etsy, Casting Spells Mermaid Crown - Wild and Free Jewelry, Shell Tiara - BigSkyCharm on Etsy (no longer available), Gypsylight Mermaid Crown - source unknown, Starfish & Shell tiara - DIY here by Running With Sisters, Seaglass Crown - Loschy on Etsy, Steampunk Octopus Tiara - Angelyques on Etsy, Single Shell Tiara - from here, Dreamer Flower Crown, as before, Sea Queen Mermaid Crown - ScarletHarlow on Etsy, Shell Crown, Freepeople as before, Pink Flowers & Shell Crown - GardensOfWhimsy on Etsy.
Whilst I was doing research I came across some absolute treasures - how about these as the crowning glory for your festival fancy dress outfit?

This beautiful tiara is the style of branches and berries is housed at the Victoria & Albert Museum. It was gifted to the museum in 2003, but dates back to 1860! I would love to know the story behind this beautiful piece, this clearly has the power to make the wearer feel like a real mermaid princess. Find out more here.
Then, I came across this beauty:

I couldn't find a huge amount of information about this, other than it is a coral tiara housed in the Museum of the Jewellery in Vicenza. I think my Hayley would look just magical with one of these priceless beauties perched on her waves - might have a save up a little first though...
If you are into ocean-themed history, the British Museum has over 200 mermaid themed items for you to browse - go here to dive into some really magical treasures.
Of course, dressing up as a mermaid is about a lot more than wearing shells in your hair, here are some of my favourite ocean-inspired pieces from around the web.

Mermaid Leggings - Amazon, Shell Cross Body Bag - ASOS, Mermaid Platforms - Dollskill, Mermaid Bodysuit - New Look, Earrings - SparkJewelers on Etsy, Mermaid Sunglasses - Lyst , Aquarium Effect Nail Polishes - Barry M
I'll share all of our outfits after Hogsozzle, if you want to see them before you are going to have to come along - there's still tickets available here. Don't forget if you are stuck for ideas, Tickled Pink has plenty of ready-to-rock festival outfits for every Childhood Dream imagined, I'm shore you'll find something...(okay, I'm finished with the mermaid puns now!)
I've got more fancy dress inspiration posts lined up this week! Please feel free to share your festival fancy dress inspiration with me on Twitter, or in the comments below.
If you are an event organiser or festival-business, I'd love to work with you this summer, get in touch by emailing me here.
FIN. :)
Thursday, 28 April 2016
Festival Fancy Dress with Tickled Pink and Hogsozzle 2016
Festivals are the best excuse I've found as a grown-up to dress up and this year, I'm going full throttle :) Our first camping festival of the year is 30 days away and this year I am working with the guys at Hogsozzle to share posts and inspiration around their festival fancy dress theme! I've been collecting inspiration around the remit of 'Childhood Dreams' over the last few weeks. I'm thinking unicorns, wings, mermaid sparkle and rainbows...I'm going to share some of my most coveted wishlist items here...links below the images where purchasable!


Sequin Leggings / Sequin Playsuit - Rosa Bloom
Feathered Cape / Embroidered Jacket- FeathersAndThreadUK on Etsy

Red Indian Make-Up - Original Source (DIY)
Unicorn Make-Up - Tumblr
Beaded Headband - Asian Wedding Ideas
Butterfly Wings - CostureroReal on Etsy

Unicorn Onesie - Tickled Pink
Flower Wings - Inspiration from here
Happy Camper Tank - Teesandtankyou on Etsy
Rainbow Maxi Skirt - Free People

Moon Phase Leggings - WhiskeyDogWares on Etsy
Starry Boots - Modcloth
Galaxy Print Shorts- Coquetry Clothing on Etsy
Body Harness - Iron Oxide on Etsy
I've just shared a sneaky look at my first-night fancy dress for Hogsozzle over on my instagram - keep an eye out as I add to my costume with some fun DIY's over the next few weeks. I'm working with Tickled Pink Fancy Dress and the Hogsozzle organisers to bring you loads more fancy dress inspiration in the run up to the festival season. Share your ideas on social media with the hashtag #festivalfancydress! I can't wait to get on the road with The Turner Brothers and start the rum-soaked, sunshiny, field-living dress-up fun.
Katy
Monday, 7 July 2014
Super Healthy Summer Eating Challenge Of Fun

Once, I was quite a bit larger than I am now. I lost about 3 stone in total. I don't like to think back to much to that time in my life but I have to constantly remind myself not to reach for that second slice of cake, not to always order the thing on the menu with the most cheese. This summer I want to get my body in better shape. I'm currently about the right weight for my height but I would feel so much better three or four pounds lighter and I know I can do it.

Here are some of my very favourite links and things from the web helping me with this mission.
If you are trying to track what you are eating for either weight gain or loss, you really can't go wrong with My Fitness Pal. The database of foods is extensive, I've yet to have to add anything from full meals in popular restaurant chains to individual items that I have bought at all three supermarkets I regularly visit. It's pretty impressive. It will also add recipes to the database simply by copying and pasting the webpage into their application. Sign up for My Fitness Pal on your or the web, and add me as a friend on there if you like :)
One thing I fail at hugely is eating a varied diet when I'm trying to lose weight. So, yesterday for dinner I made a salad with grated carrot, cucumber, ham, pumpkin seeds, shredded beetroot and a mango and chilli dressing. I ate it in a wrap for my dinner, and then another wrap of it for my lunch today, and guess what I have this evening? Yup, another wrap of ham and pumpkin seed salad. So I love this page for it's array of meals between 200 & 400 calories. The Moroccan Chicken with Sweet Potato Mash is a real favourite, there is always plenty for a sandwich or pitta the next day. This week I'm going to be trying the Root Curry

Superfood Salad with Sirloin Steak - a lunch last week from a local gastropub. Yum! I chose to have the dressing on the side so I would know exactly how much I've had - a good tip as many pubs tend to add much more dressing than you would at home.
One of my favourite healthy eating blogs is Eat Yourself Skinny. I can't wait to try some of her puddings. I just saw today a really delicious looking salad with quinoa (pronounced keen-wa) which I'm anxious to have a bash at.
I'll also be trying the 30 Day Ab and Squat Challenge. I'm terrified of exercising at the moment as I have a slipped disc that is severely affecting both the movement and the feeling in my right arm I'll be going for an MRI scan in a few weeks, so I can't wait for that. The challenge is one of the only 30-day challenges I could find that had the right exercises, i.e ones that didn't involve putting a large amount of weight on my quite frankly useless arm.

This is taken from here, where there is loads more information about this challenge.
I'm a huge salty snack fan. I can literally devour a bag of crisps, a bowl of olives (sometimes both together) in about 5 seconds flat. Quite embarrassing if you are meant to be sharing with someone else. So I'll be whipping up a whole bowl of these Edamame treats created by Rosie of The Londoner this week too, they sound too good to be true.
I'm also having Epsom salt baths on a weekly basis, they are meant to draw the toxins right out of your skin, super cheap aswell, I bought a huge bag of Epsom salt for about 2 pounds, enough for several very salty baths. I'm then dousing my whole entire body in Garnier Anti-Cellulite Oil. Read some reviews of this product here on Bean's Beauty Blog and then come back to me in a few weeks when I'll be showing before and after pictures of my treacherous thighs...
So, I hope you will join me on my journey here on my blog. I do promise only one healthy eating post and recipe share per week. You can follow more of my progress on Instagram and twitter.
Hope you are having a beautiful Monday x
Friday, 10 May 2013
Ombre Hair
So, I'm about twenty years behind the rest of the internet and decided to ombre my hair. I never, ever dye my hair. Once I grew it really long and decided to donate it to a cancer charity when I had it cut. So, you can't dye or bleach it or anything if you do that. If you are thinking about doing it, you should, as it takes 40 donations to make a real-hair wig for a cancer survivor. Cancer is scary.
Anyway, this is the result of three packs of L'oreal Wild Ombre 1. ***awkward selfie alert!***

Anyway, this is the result of three packs of L'oreal Wild Ombre 1. ***awkward selfie alert!***

Cue speech about posting pictures of myself online...
So, I don't really like posting pics of myself on the internet. Firstly, as you can clearly see, I have a monstrous forehead that kind of takes up most of the frame. My friends know this, so they instruct me in detail before taking pictures of me. "Tilt your heard down!" "Hold your chin in!" "Push your eyeballs outwards!". I try to heed this advice when taking photos of myself but mostly I end up looking like a cone head. Secondly, it feels a little self-indulgent. I know the whole point of blogging is to put yourself out there and I am trying to take my own advice of putting a personable (if hugely foreheady) face to your online persona.
Still, it's a fear I am trying to overcome, so, um...enjoy these photos of me. I promise not to become one of those bloggers that post hundreds of pictures of themselves on their blog and not much else. In fact I have some exciting things planned for my blog! I'm going to be doing some CV advice, some more articles on successful blogging & detailing my journey into a more frugal, healthy lifestyle :)
Have a lovely weekend, I'm off to swish my hair around in front of the mirror. x
Monday, 28 January 2013
Birthday Wishlist
February is my birthday month! It's just far enough away from Christmas that I feel justified in writing a wishlist...

1. Polaroid Z2300 from Photojojo
2. 'K' Jumper from Topshop
3. Hello Disco Bootie from Modcloth
4. Skullcandy DB Hesh Headphones from Amazon
5. Notting Hill Gate Crystal Cap Nail Polish from Nails Inc
6. Babliss Thermo Rollers from Argos
I'm working super hard this week writing an e-course for job seekers who want to utilise social media. Right now the whole thing is way too long as I kind of sat down and just spilled my recruitment and social media guts all over the page. I'll be launching that, along with 50 ways you can use social media in your job search, hopefully next week.
Happy Monday! ♥♥♥
Thursday, 18 October 2012
Unicorn Horn Nail Tutorial
Who doesn't want unicorn horn nails? I love these so much I've been wearing them for three days :-)

I hope you love this tutorial as much as I loved making it :-)


I used Barry M in creamy lilac to do a base coat - one of my favourite colours. I think this tutorial would work just as well with a pale blue or pink, or even navy or black. I've showed the second pic to show how shiny it is, it really looks nice on it's own, I'm already halfway through the bottle!

Matte topcoat is my new favourite thing ever. Look what it does to this shiny lilac! How awesome right? You'll need to use a matte topcoat twice in this tutorial, because you won't get the same effect if you use a regular topcoat over the whole thing and it won't last very long otherwise.

Use a thick, opaque white to draw on unicorn horn shapes. I guess you could use tape for this step, but I find it hard to get the horns centered that way. The simplest method is to get a little paint on the regular brush that it came with, start at the base and drag upwards, lifting the brush as you get the tip of the nail. Try to lift it right off at the end to make a point. You can see above where I have gone back with the lilac to tidy up my horn points.

Once the points are nice and pointy, paint over the whole nail with the matte topcoat again. This should ensure it lasts at least two or three days (unless you happen to be taking pictures of your nails and end up smudging one, booo!)

Cut a strip of cardboard just slightly thinner than the widest point of your horns. Splodge a bit of metallic (gold or silver would look cool!) polish on a plastic surface. Next, take your strip of cardboard and dunk it into the splodge. Make one 'stamp' of the the very end on a bit of tissue to get the excess off, and then use the very end of the cardboard to print tiny lines at an angle going up the horn. I found I only had to reload the card every few nails because I was pressing really lightly. As you get to the top of the horn, tilt the card so you are just using the very corner. Easy!


Done! Cute right? I'd love to know what you think and if you gave this one a bash - don't be afraid to send me a pic, I'll show any pics I get here on my blog with your link :-)

I hope you love this tutorial as much as I loved making it :-)


I used Barry M in creamy lilac to do a base coat - one of my favourite colours. I think this tutorial would work just as well with a pale blue or pink, or even navy or black. I've showed the second pic to show how shiny it is, it really looks nice on it's own, I'm already halfway through the bottle!

Matte topcoat is my new favourite thing ever. Look what it does to this shiny lilac! How awesome right? You'll need to use a matte topcoat twice in this tutorial, because you won't get the same effect if you use a regular topcoat over the whole thing and it won't last very long otherwise.

Use a thick, opaque white to draw on unicorn horn shapes. I guess you could use tape for this step, but I find it hard to get the horns centered that way. The simplest method is to get a little paint on the regular brush that it came with, start at the base and drag upwards, lifting the brush as you get the tip of the nail. Try to lift it right off at the end to make a point. You can see above where I have gone back with the lilac to tidy up my horn points.

Once the points are nice and pointy, paint over the whole nail with the matte topcoat again. This should ensure it lasts at least two or three days (unless you happen to be taking pictures of your nails and end up smudging one, booo!)

Cut a strip of cardboard just slightly thinner than the widest point of your horns. Splodge a bit of metallic (gold or silver would look cool!) polish on a plastic surface. Next, take your strip of cardboard and dunk it into the splodge. Make one 'stamp' of the the very end on a bit of tissue to get the excess off, and then use the very end of the cardboard to print tiny lines at an angle going up the horn. I found I only had to reload the card every few nails because I was pressing really lightly. As you get to the top of the horn, tilt the card so you are just using the very corner. Easy!


Done! Cute right? I'd love to know what you think and if you gave this one a bash - don't be afraid to send me a pic, I'll show any pics I get here on my blog with your link :-)
Thursday, 4 October 2012
Bleach Stencil T-Shirt DIY Tutorial
Bleached T-Shirt tutorials are all over the web but I thought I would share how I made mine anyway because I'm so in love with my new t-shirt, and because I had to overcome a few, erm, issues during the making process.
I originally wasn't going to post this because I bought the wrong type of greaseproof paper. 'Freezer Paper' in the UK is 'greaseproof paper' but it needs to be the plastic-backed stuff or you can't iron it on. I overcame this by using tape but I know I would have got a cleaner result if I had used the right type of paper.
I'm going to be stocking up on cheap thrifted tee's for more designs. Do you like?


You will need:
A dark coloured t-shirt in cotton or jersey fabric
Greaseproof papr (or in fact, any paper as this is not an iron-on method)
A beaker to mix bleach in
An old spray bottle (washed out well!)
Graph paper
Sharpie
Pencil
Ruler
Craft knife.

1. Draw out your word on graph paper. I had to do the K A I on one page and the T E on another to fit it in. You could use your regular writing but I used block capitals as they are easier to cut out. I'd probably do them a little small if I was to do it again.

2. Trace over your design in Sharpie (or any felt tip or thick pen)

3. Transfer your design to the greaseproof paper or whatever paper you are using. Thick scrap paper might work too.

4. Position your design to make sure you have enough room on the shirt. Probably should think about this before taking the time to draw it out. Mine fits, just, but with the leaky bleach I ended up with a much bigger name than I thought. I'll know next time!
The hearts were a little optimistic for my knife skills :-)

5. Okay, so this is where things just kind of kooky. Bear with me! I realised before cutting that the paper wasn't going to be the iron on kind. For your reference, if you live in the UK, you are looking for PLASTIC BACKED greaseproof paper. Not 'butchers paper' or 'baking paper' Just Plastic Backed Greaseproof Paper. They don't sell it in Asda, Wilkinson or Poundland. Bloody inconsiderate if you ask me.
So after you have cut out the design, place it over the t-shirt and tape in place I've taped the edges and also used the very edge of a number of extra strips to adhere the sticky-out bits to the t-shirt. Brown packing tape worked perfectly. You won't be able to see any of the tiny indentations afterwards because the bleach will 'bleed' out under the paper. So go for it with the tape. If I made this short again I would tape MORE, especially on the K T & E. See why below.

6. Make up a solution of 1 part water to 1 part bleach. Do this in a ventilated area with no children or pets and if you are the spilling type (which I am) cover everything including yourself in plastic.
Place a piece of cardboard between the layers of your shirt to protect the back.
Pour the solution in the spray bottle and spray directly onto the t-shirt. Try not to aim at an angle. A few short sprays on each letter should do the trick.
Peel the whole stencil off and remove the tape. You'll need to chuck that now because it will be wet and icky.

7. Wait for 15 minutes. You'll see the design start to develop! Once you have done the waiting part rinse your t-shirt in cold water and chuck it in the washing machine on a quick wash. I probably wouldn't recommend putting anything else in the machine at the same time just in case.
Once your t-shirt is dried, wear with pride :-)

Please let me know what you think and if you try this out! I'd love to see your take on this DIY :-)
Friday, 21 September 2012
Ombre French Manicure Tutorial How-To
A month or so back I posted this picture of an Ombre French Manicure that I tried.It's proved quite popular on Pintrest...(follow me here)...so I thought as I have suddenly found myself with much less to do in the day that I'd post a tutorial - I hope you like! As I have said before I love love love reading comments, whether complimentary or constructively critical. (I can take it. I'll only cry into my coffee for like, 2 days)


Supplies: Make-up sponge, French Manicure Pink by Collection 2000, White by NYC.


Paint one very thin coat of pink over bare nails. French Manicure pink is usually very, very thin and it's easy to get streaky. Try and get as even a coat as you can!
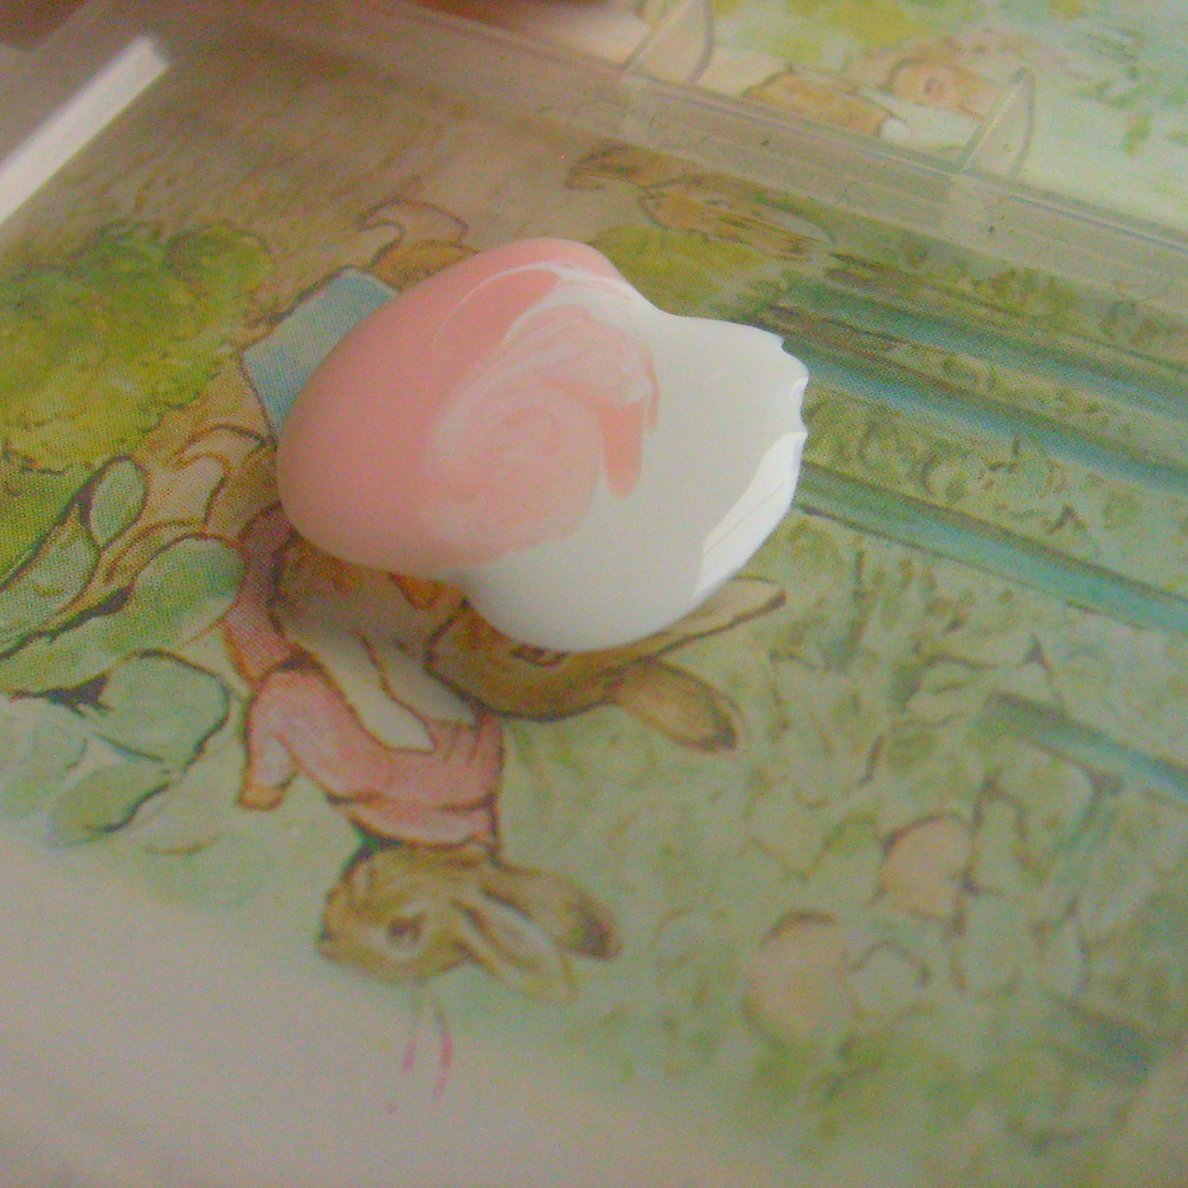
Blob two short lines of nail polish onto a plastic base. I've used a small storage box lid. Be careful, because nail polish can melt some things with shiny, laminated coatings and will pick up a lot of it's colour. I found this out when I tried to use a sweet wrapper.
Using a pin or earring or old fork tine, mix the two colours where they meet. The more you mix, the better gradient effect you will have.

Press a small, dense sponge down on the polish. You need to move quickly here because the polish will dry and go tacky. Push down gently a few times to encourage the sponge to pick up all the polish.

Press the sponge down on your nail. Try to cover 2/3's of the nail. You might need a few extra dabs on the sides. Don't worry if you get some on your skin, because you can always clean up after with nail polish remover and a small brush.

Looks pretty messy huh? Don't worry! Where you see a stronger line that doesn't seem gradienty enough (I totally made up a word) you can dab your sponge lightly over the area to increase the blend effect.

Messy!

Next, dip your sponge in the remainder of the white polish and dab carefully over the tops of your nails. This will give you the pure white - to - pure pink look.

Immediately paint another very thin layer of the pink over the whole effect.

And you are done! I think I could have done with a few more dabs of white but overall I'm really happy with my nails right no, it only takes a little while, because you can paint each new layer straight away!
I'm off to the adventure playground now to play pirates with a small noisy fellow. I hope your Friday is just as fun. x
Subscribe to:
Posts (Atom)