Showing posts with label tutorial. Show all posts

Tuesday, 17 January 2017

Create Quote Memes & Images For Instagram and Beyond!

In recent years, when I've wanted to create an image for the blog or as a background to a slide, or whatever, I've gone straight to Picmonkey and it's done the job perfectly, as well as speedily (I'm not sponsored by them, promise! In fact all my tutorials utilise the free features only, but I do upgrade my membership when I have a few pennies because the font selection is on point)

If you haven't tried it yet, do! Today I want to share my favourite way of making fun quote images for my Instagram feed. I've started trying to curate my Instagram feed a little more, and it's really paying off.

Here's a little tutorial on how I make my cosmic quote images - for more, come over to my Instagram feed ---> here

1. Find your quote - I picked one that reflected by aspiration for the year, to live more in the moment! Don't forget, if you use a quote by someone else, which many will be, it's ethical to give a little credit.

2. Head over to www.picmonkey.com and select 'Design' followed by 'Blank Canvas'

3. Choose a font, either from Picmonkey's library or one of your own. The font works better with a plenty of black space-  and write your quote in big  lettering in the centre (or, at a quirky angle!)


4. Now, you need a background. I like to use royalty-free images by NASA for a cosmic feel but you could use anything at all. Busy patterns work best. Select the little butterfly icon and then chose 'Add Your Own' - you can then select any image from your computer. It'll plonk it over the top like this:


5. Super simple - use the Overlay toolbox that pops up to select the Blend Mode 'Add' This will fill all the black space in your writing with your image. You can move it around using the little arrows to get the best placement. Then save and BAM, you have a tailored, original quote image to share.


I don't bother with this at the moment, but you could pop your name in tiny writing at the bottom and apply the same technique, if you are worried people will reshare your work and not credit you for it.

I can think of SO many uses for this snazzy trick - blog headers, infographics, cover photos...I'd love to see what you do with it so please do tag me in your images if you use my tutorial.

Keep an eye out, I'll be sharing how you can get access to, and then use, Instagram insights to boost your following and start earning money through your Instagram later in the week. Have a great day!

Thursday, 11 June 2015

3 Cross Platform Promotion Ideas

One of the things I love  most about the internet is just how many different ways there are to access content about things I am interested in.

Cross promotion is all about using one platform or social network to promote another, and back again. The benefits being, if you can get fans or followers to promote you by retweeting/posting/sharing your content on more than one platform, you are instantly increasing your audience and reach.

Here are three easy ways you can cross-promote your small business, brand or product. Please don't forget to leave a comment if you found these tips useful.


I have a problem with my twitter username. When I decided to change my internet name to Katy Clouds, I was pretty confident I had found a name that noone else was using in the way I wanted to use it. I left twitter to last because it was the only one that was going to allow me to change my username rather than setting up a new account or profile.

The username I wanted was taken, so I am @katyclouds on instagram and @katy_clouds on twitter.

It doesn't matter much, and I don't think it's lost me any followers. However, it's important you are cohesive across all platforms if you are trying to build a brand.

Having the same profile picture helps, and similiar cover photos for twitter & Facebook also give a strong branded image and let potential followers coming over from one platform know that they have found the right you.

Here's an example from The Turner Brothers Facebook and Twitter pages.


You can find dimensions out for all the social networks profile images here.

(I'd be interested in linking a smaller blog here, if you have provided this information in some way on your blog or webpage, please let me know, I would prefer to support a small blogger!)

You could also use Picmonkey if you want to create your own cover photo collages or make sure your images are sized right with their templates. It's free, and possibly the best image editor available online for free at the moment,


So, you want your Instagram followers to check out your brand's Facebook page. You are putting the link in your photo descriptions and in your bio but you don't seem to be picking up many followers.

Think about it. How often do YOU bother looking at peoples bios to find their links and follow them? The internet is making us increasingly lazy, and the shorter number of clicks the better to gain followers, fact.

So I use a little tactic that has proved really successful. It involves creating an image to share your information. An image which can then be posted across ALL platforms, including instagram. I'd like to share a quick tutorial for doing this using Picmonkey (I just can't get enough, it really does rock)

1. Select a suitable image.

I'm going to use Picmonkey's collage option to create a 3 x 3 collage of images for my sharable picture. You can skip this and just use one but I want a high impact, exciting image as my backdrop and I have enough pictures stored to do this super easily.


2. Turn it into a backdrop

Chose 'Edit' at the top to convert your collage into one image and make it available for editing. You can skip making it black and white if you want. In this case, because some of the photos I chose are not full colour, I thought it would look better if they were all black and white. The option to do this is under the little wand symbol on the far left of the Edit screen.

Now we are going to put a screen over the image to make the text stand out against it.

Use the 'overlays' option to cover your whole picture in a big black square.


Then, change Colour 1 to white (in fact, it doesn't have to be white, if a pink or blue screen would work for your brand, give it a shot!) and turn the fade slider up to 50.

The result should look something like this:


3. Add info.

The aim of this image I am creating is to tell the bands growing instagram following how they can find The Turner Brothers on facebook. You could easily use the same tactic on twitter to tell followers how to find you on Pinterest, or even include multiple ways to get in contact.


And it's ready to share :) I'll be posting this on the band's instagram feed later today. This only took me ten minutes and I was writing this tutorial at the same time. Let me know if you give this idea a go.


So you've got your cohesive branding sorted and you've been creating images to share across multiple platforms. How can you keep the momentum going? 

Make sure you save everything you create to post. The image above obviously wouldn't be useful to post on twitter, but as well as instagram it could be used to promote the band on Facebook as a post on it's own and a photo comment, Pinterest, Google+....

Some other ways you could recycle content in this way to increase your content cross promotion:
  • Whilst editing images, create a few variations. Change the text to promote your insta feed and use the image a few weeks later on Twitter.
  • Repost/retweet previously posted content on a different social network with a cheeky "Did you see this shot of our studio/performance/merchandise yet?"
  • Create a collage as an image to post using images you have already shared (a great tactic for dull weeks when you haven't got much new content to share, and creating collages takes only a few seconds in most image editing programs) Save them to use as a backdrop for future info sharing posts too, now that's multi-tasking!

DON'T FORGET:

  • Spread things out. Don't post the same image on three networks in the same day. 
  • Don't over saturate your followers. Most people won't want to see seven or eight posts a day of the same sort of thing.
  • Make cross-promotion only 10% of your content. The industry standard is 70% lifestyle, 20% direct promotion (this would encompass the types of posts we have discussed here as well as direct links to products) and 10% promotion of similar or aligned products or brands.

Let me know if you have any questions, I hope this was helpful!

Katy x


Tuesday, 2 September 2014

How To Remove The White Borders on Images In Your Blogger Blog

Hey there:) The little fellow went back to school today and I am back at the computer, pimping myself out on Peopleperhour.com and generally reacquainting myself with the internet after a few weeks of flu & summer holidays.

I still get daily comments on my 'How To Make A Perfect Circle Picture' blog post. Which surprises me really as Picmonkey now have an option to use a circle shape 'cut out' that does the job a treat. Still, I love getting comments and people reading my blog so I'm not complaining in the slightest.

One of the comments I get a lot is that readers have created their circle picture and added it to their blog, but Blogger seems to have added a white shadow border to the image. This is happening because the Blogger template that you are using has a piece of code written into it that overrides any other other options you may have selected. Luckily Blogger provides a handy little widget to insert new overriding code and that is what we are going to do.

1.

From your Blogger dashboard, select the dropdown box with the little document icon for the blog you want to work on. Its the middle one here:


Select the 'Template' option.


Select 'Customise'

2.

From the five options in white writing on the left-hand side of the screen, select 'Advanced' and when the selection box comes up to the right, scroll to the bottom of the options and select 'Add CSS'


Now, a large white box will appear. This is where you can enter any CSS or HTML code that you want to override all the other code in your blog. I'm going to copy the code from my personal blog template but I feel I should add a little disclaimer here in the spirit of honestly, I didn't write this code and I can't remember where I originally got it from - it's a generic code snippet available from many locations around the web.

Simply copy the code from the box below into the box in the template editor.


3.

Click the orange 'Apply To Blog' button, then go load up a new page and check out your pictures, KA-POW! That annoying border all gone.

I was just sitting here thinking; "you know what, I should put an image as an example..." then I realised this whole page is full of example images, so I'll save some pixels and sign off there :)

Hope this helps, please do leave a comment it's really appreciated.

Monday, 13 May 2013

Making Your Avatar Fabulous With Picmonkey

Mondays are all about fresh starts :)

It's hard to stand out online, fact. There are lots of things that you can do to stand out, many more salubrious than others. Why not start off your week by changing up your online person with a fabulous avatar (you know what that is don't you? That little thumbnail that appears by your content on twitter, facebook, linkedin...etc.) I'm a huge believer that you should maintain the same image across all your social networking. Makes for a more cohesive image and people will be able to recognise you instantly if they have you on a different site. 


So, I posted a little while ago on how to make any picture perfectly round with Picmonkey. I thought it would be fun to show a few more techniques that Picmonkey has to offer to awesome up your avatar.


Super easy! I have my Facebook avatar like this, and I always get questions about it. I thought it would be a great one to start off with. Simply load up your image...


See that little pumpkin on the bottom of the left hand column? Clicking it will give you a whole bunch of fun effects and overlays. Click the pumpkin, and then scroll down to the 'Sweethearts' section. This is where you will find the 'Heart Cutouts' option. See is there at the bottom?


Click it, and your face will be framed by a heart with a spotty pink background. I changed mine to white use the sliders at the bottom left of the sreen. Use 'Color' instead of swatch. 

Save your file as a 'jpg' or you'll get a funny fuzzy edge to the heart. Here's how mine looks at the moment:


So easy right?


This is a great idea if you are branding yourself online, use your thumbnail to advertise your brand or your blog! It helps to have a shorter name. If you name is Charlene Whippersnapper you might struggle making the text visible :(


Start off with a picture that represents what you are all about. I've rounded the corners because I'm stuck in 1999 and I think it looks cute. Don't judge. The fifth icon down on the left hand bar is a little group of three shapes. That's your overlays. The first option is geometric and I use that the most! I picked a rectangle and sized it on my image. I also twisted it 90 degrees because I want the text up the side. It's super easy to experiment with positions on Picmonkey, so have a play around and see what suits your image best.


Fade it out! Make your text pop without distracting from your image by fading your text background to 50%. I use this technique all the time to add clear text to pictures that I know are going to come up small.


Next choose a font. Big, blocky fonts are obviously a better choice, as your thumbnail is going to be teeny especially on phone screens. I think Budmo Jiggler is one of my all time favourite fonts, but BASE is a great option too. I would seriously recommend a Royale membership to Picmonkey just based on the amazing font options.  I did a little swivellyness on my text, that's the little arm sticking up out of the top if you can't work it out.

Done. Great for Linkedin and Google+ in my opinion :)


Selective colour is one of my favourite effects when used right :)


Start with a full colour image. Load it up into Picmonkey.


The second little icon down on the left hand navigation bar is a little vial of bubbling liquid. That's where you will find the effects. Black and white is a free one.


Next to the 'Fade' slider you'll see a little paintbrush. It's this that you can use to remove the black and white filter on the sections that you want You can adjust the size and density of your eraser brush too. It makes for a fun effect on an avatar.


I hope you have enjoyed these three techniques to make your thumbnail picture fabulous! Don't be shy about leaving a comment :)

Yes, I know. I made a deal about posting pictures of myself online and here is a post full of pictures of me, I'm nothing if not inconsistant eh?

I have not used any of Picmonkey's Royale effects in these suggestions. However I do have a Royale account courtsey of the wonderful people at Picmonkey.

Tuesday, 12 February 2013

Padded Storage Box DIY

Boring old shoeboxes be gone! I've been jazzing mine up in this super-easy way, adding pops of pattern and fun to my living room :-)


I whipped this up in about half an hour, it now has pride of place on the shelf underneath my coffee table. Let me know if you give it a whirl!


You Will Need:

Shoebox or other cardboard box with a sturdy, lift off lid.
Piece of wadding cut to the same size as the life
Piece of fabric cut two inches larger all the way around
Glue Gun
Pen
Ruler
Buttons
Tape Measure
Needle & Thread


1. Please ignore the fact that I still have my Glitter Gradient Manicure on! Drawn across the diagonal on the top of your lid. Measure the distance from the corner to the centre and put a dot halfway between them.


2. Wow, that's a bad quality photo! Sorry about that. Why does my needle look so odd? I stuck it down into my gluegun barrel. Yup. Use a big needle to punch a hole in the lid. Mine was sturdy enough to withstand a hole being punches but you could put a blob of bluetack on the underside if you think your lid might cave in.


3. Sandwich your wadding between your fabric and the lid. Line it up so there is an even amount of fabric on  each side. Then you can snip off the very corners to reduce bunching later on. Spread a line of glue on the inside rim of your lid, and tightly fold the fabric over. make sure you pull tight enough for a smooth lid but not so tight that you totally flatten the wadding. Pop a blob of glue in each corner and pull the corner in.


4. I changed my buttons at the last minute for these tiny flower ones. Poke your needle through the hole on the underside, through one hole in your button (see the picture above) and then down again through the second hole. It's a little struggle to find the hole again because you are going in blind, but give it a wiggle and you should be able to pop it back through. Tie the two ends together tightly for a quilted effect.


5. Looks cute huh? Check your lid fits on and snip the ends of the thread. Fill your box with stuff that you want to store! I've filled mine with small plastic dinosaurs and cars :-)


The lighting has been SO bad for taking indoor photos recently, so I am sorry about the quality of these shots. I hope you like the DIY anyway!

Monday, 11 February 2013

Picmonkey - Awesome Tips & Tricks

Picmonkey is a free web-based photo editor with a bunch of great tools and effects to enhance your photos. I use it as my main image editor and I thought it would be fun to share some of my favourite things that I have discovered about it. There are hundreds of ways to combine the tools to give a more professional finish to your images. Click any of the screenshots to get a bigger, clearer view.

All the tips here are available for non-Royale (their premium service) users. This includes fonts I have used and all the effects, overlays and tools. I am a Royale member though, and I highly recommend it, loads more fonts and amazing stuff becomes available to you, and it's under £3 a month. (I should point out that I am not affliated with Picmonkey. This article is my own opinion and it's my own money that paid for the Royale membership)

So I have three main tips and a bunch of little tricks. If you have any questions, please feel free to pop them in the comments I would be happy to clarify anything. I'm also really interested in seeing other Picmonkey tutorials so don't be afraid to link yours!


1. Starting with a blank canvas
Useful if you are looking to make something from scratch. I used this technique to make both my navigation bar (Those tabs with sections of my blog) and also my banner.
So easy that I wouldn't even call this a tutorial. Simply open any picture of a size equal to (or larger so that you can crop it down) the final image that you want.

Open the 'Overlays' menu item on the left, select either square or rectangle. Once it's placed stretch it big enough to cover the whole image and then some.


Use the toolbox to select a colour for your blank canvas. White is standard. You can then crop this to the size you want. See up there where it says 'Open', 'Save' & Share? Then there are two small arrows (undo and redo). The next is 'Flatten'. It merges all the layers in your image. So instead of being the original picture with a white box on top, your image will simply be a white box.
2. Jazz Up Your Banners (Layering Overlays)
I've spoken a few times about using a header image to show as your thumbnail on whatever sites you share your blog. You might like to make an image for anything, and want some text on it. Picmonkey offers a large range of overlays and one of the cool things you can do is layer them over one another to give a more professional polished look.


Start with the image that you want to add a banner to. This might be a blank canvas or an photo like above.


Open up the banners section and choose one you like. This also would look great with any of the geometric overlays. Be aware that it must be just one section - the banners with more than one solid piece won't work with this layering technique.

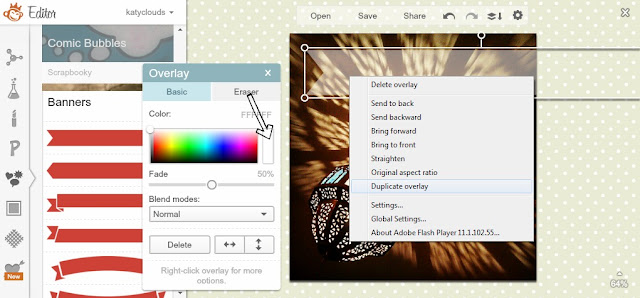
I've faded out the bottom overlay to blend it more into the image. Nice huh? I used a 50% fade. Next, duplicate the overlay by right clicking and selecting 'Duplicate Overlay'. Make it a bit smaller (trial and error will help here!) then think about colours. I used the light blue shade visable in one of this beautiful Morrocan light's shade. It's not immediately obvious, but if you click in the box that arrow is pointing to, your cursor will become a colour dropper and you can select any colour from your image. This is a great way to get a fully cohesive look.


Use your cursor to move the new coloured banner over the top of the first one. You can experiment with layering three or even four overlays together, altering the fade and colours with each. Position it so there is an even border. Cute!


I like to use this method to make banners for my text.
3. Funk Up Your Text - How to Add a Drop Shadow Effect
I wish that there was the option to add drop shadow and perhaps even an outline glow to the text in Picmonkey, but I've figured out how to DIY the drop shadow. This works with any solid overlay too!


Chose your font, click 'Add Text' and type what you want to say. Lobster Two is one of my favourite free fonts.


Right-click and duplicate the overlay, just as we did before. Now, the first text will be your shadow and the second your actual text. If you want your text to be black you'll need to make the shadow text a deep grey. Otherwise change only the colour of the top text.


Move the coloured text on top until just a teeny bit of the shadow is showing. It's really easy to adjust the angle of the 'lighting', just move around the top text until you are happy.


These little 'dings' to add a bit of sparkle to text - don't be afraid to experiment with all the options! 
Because it's sometimes a hassle to get the shadow text in the right place to start off, I like to make this on a white background (see above) and then crop it right down so there is no additional space. Then I open up the image that I want to add the text to, and use the 'Use Your Own' overlay option. You'll be able to load up the ready made shadowed text and adjust it's size and position as a complete object. Easy!

I hope you had a lovely weekend! I had a great birthday, and I'm doing well with my 29 photos challenge. Are you following me on instagram yet?

This week I have a Valentines craft project that I've been working on for weeks, aswell as more information about my e-course on Social Media for Jobseekers :-)

Similiar Posts...